Kit Kat Cake Recipe: Break Into Chocolate Bliss
If you’re a chocolate lover, get ready to embark on a scrumptious adventure with the Kit Kat Cake Recipe: Break into Chocolate Bliss! It’s a dessert that will make your taste buds dance and satisfy your sweet tooth like never before. Brace yourself for layers of moist cake, decadent chocolate frosting, and, of course, the iconic crunch of Kit Kat bars. Warning: This dessert may cause extreme cravings and leave you begging for seconds!
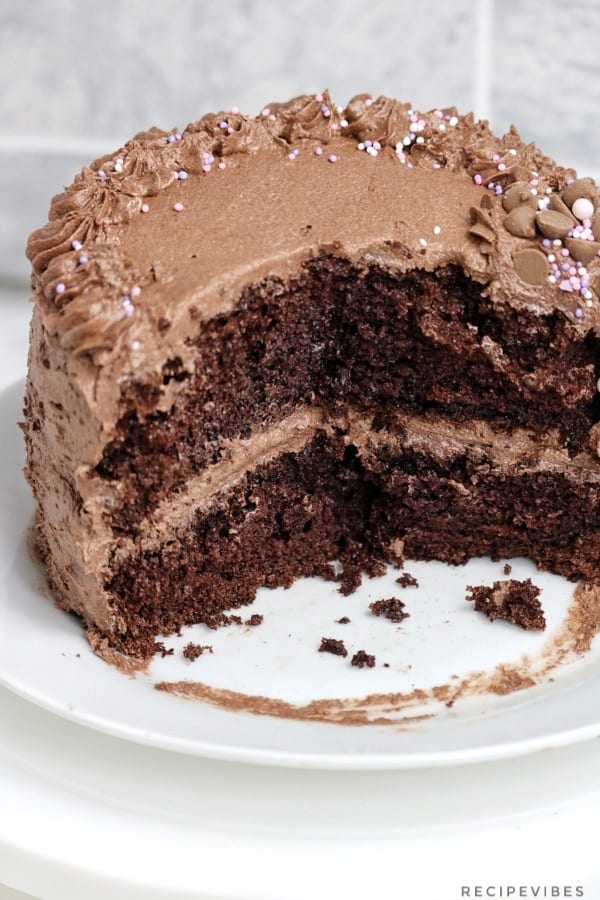
Imagine sinking your fork into a slice of moist and fluffy chocolate cake, layered with creamy chocolate frosting. Now, picture the outer edge of this delectable creation adorned with Kit Kat bars, forming a tempting wall of chocolatey goodness. The combination of cake, frosting, and Kit Kat bars creates a symphony of flavors and textures that will leave you in awe.
Whether you’re celebrating a special occasion or simply craving an indulgent treat, this Kit Kat Cake Recipe is the ultimate showstopper. It’s easy to make, requiring only a handful of ingredients, and the end result is a stunning cake that will impress your friends and family. So, get ready to break into chocolate bliss with this irresistible dessert that will have everyone asking for the recipe!
Kit Kat Cake Recipe: Break into Chocolate Bliss
Welcome to the ultimate indulgence for chocolate lovers – the Kit Kat Cake! If you’re craving a rich and decadent dessert that combines the crunch of Kit Kat bars with the moistness of cake, then you’re in for a treat. This cake is not only delicious but also visually stunning, making it the perfect centerpiece for any celebration or special occasion. In this article, we’ll take you step by step through the process of creating your very own Kit Kat Cake that will have everyone craving for more.
The History of Kit Kat
Before we dive into the scrumptious details of the Kit Kat Cake recipe, let’s take a moment to appreciate the history and origins of this beloved chocolate bar. Kit Kat was first introduced in 1935 by Rowntree’s of York, a British confectionery company. Its unique combination of layers of wafer and chocolate quickly gained popularity, and it became a global success. Over the years, Kit Kat has become a staple sweet treat for people of all ages, and its iconic “Have a break, have a Kit Kat” slogan has become synonymous with taking time to relax and enjoy a moment of pure bliss.
Kit Kat bars are characterized by their distinctive shape, with a rectangular format that can easily be snapped into individual finger-sized portions. This signature design allows for easy sharing and has contributed to the enjoyment of Kit Kat as a social snack. With its rich history and enduring appeal, it’s no wonder that Kit Kat has become an iconic brand recognized and cherished by chocolate enthusiasts worldwide.
Now, let’s move on to the main event – the delicious Kit Kat Cake recipe that will satisfy your chocolate cravings and wow your taste buds.
Gather Your Ingredients
Before you can embark on your Kit Kat Cake adventure, you’ll need to gather the necessary ingredients. Here’s a list of what you’ll need:
- 2 cups all-purpose flour
- 1 1/2 cups granulated sugar
- 3/4 cup unsweetened cocoa powder
- 1 1/2 teaspoons baking powder
- 1 1/2 teaspoons baking soda
- 1 teaspoon salt
- 2 large eggs
- 1 cup milk
- 1/2 cup vegetable oil
- 2 teaspoons vanilla extract
- 1 cup boiling water
- 20-25 Kit Kat bars (standard size)
- Whipped cream or frosting of your choice
- Chocolate ganache (optional)
- Assorted candies or chocolate decorations for garnish
Once you have all your ingredients ready, it’s time to don your apron and get baking!
Preparation: Making the Cake
1. Start by preheating the oven to 350°F (175°C) and greasing two 9-inch round cake pans.
2. In a large mixing bowl, combine the flour, sugar, cocoa powder, baking powder, baking soda, and salt. Mix well until all the dry ingredients are evenly incorporated.
3. Add the eggs, milk, vegetable oil, and vanilla extract to the dry mixture. Beat on medium speed for about 2 minutes, scraping down the sides of the bowl as needed.
4. Gradually add the boiling water to the batter, mixing slowly to avoid splashing. The batter will be thin, but this is perfectly normal.
5. Divide the batter evenly between the prepared cake pans and smooth the tops with a spatula.
6. Bake the cakes in the preheated oven for approximately 30 to 35 minutes, or until a toothpick inserted into the center comes out clean.
7. Once the cakes are baked, remove them from the oven and let them cool in the pans for about 10 minutes. Then, transfer them to a wire rack to cool completely.
Now that your cakes are ready, it’s time to assemble the Kit Kat Cake!
Assembly: Building Your Kit Kat Cake
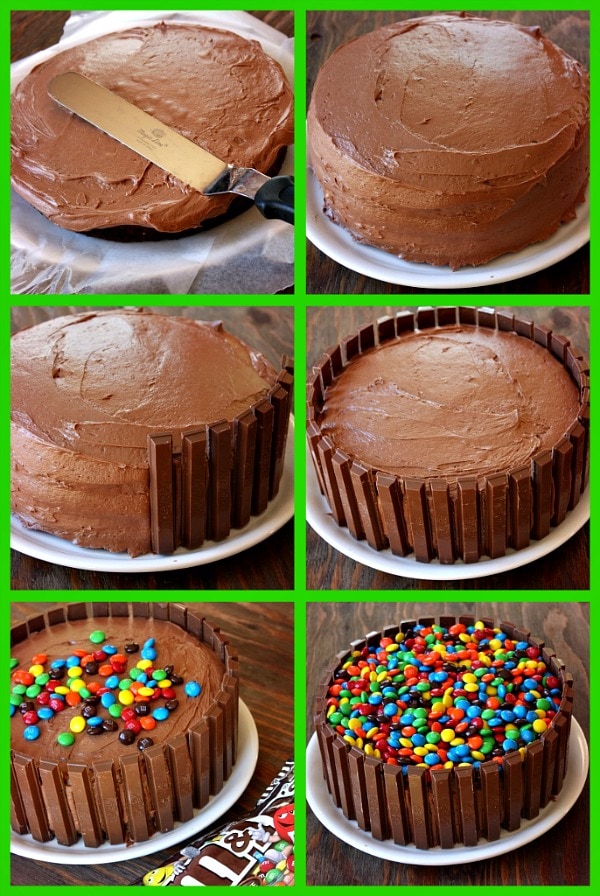
1. Place one of the cooled cake layers on a serving plate or cake stand. Spread a layer of whipped cream or frosting of your choice on top.
2. Take the Kit Kat bars and gently break them into individual fingers. Press the Kit Kat fingers vertically around the entire perimeter of the cake, creating a border. Make sure to leave a small gap between each Kit Kat finger to allow for the frosting to show through.
3. Once the Kit Kat border is complete, spread another layer of whipped cream or frosting on top of the cake, within the Kit Kat border.
4. Carefully place the second cake layer on top of the frosted layer, pressing down gently to secure it.
5. Frost the top and sides of the entire cake with whipped cream or frosting, creating a smooth and even layer. If desired, you can also pour a rich chocolate ganache over the top of the cake for an extra indulgent touch.
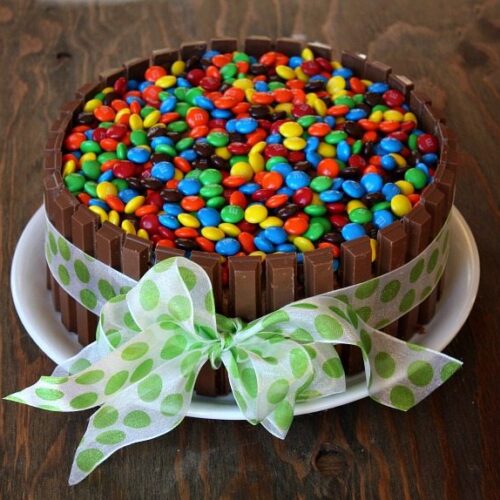
6. Finally, it’s time to unleash your creativity! Decorate the top of the cake with assorted candies or chocolate decorations of your choice. Get adventurous and have fun with it!
Voila! Your Kit Kat Cake is now ready to be enjoyed. Cut into generous slices and savor each delectable bite of chocolate bliss.
Tips for Success: Taking Your Kit Kat Cake to the Next Level
Now that you know how to create a stunning Kit Kat Cake, here are a few tips to help you elevate your baking game:
Experiment with Flavors
While the classic Kit Kat Cake recipe is undeniably delicious, don’t be afraid to get creative with different flavor combinations. Consider adding a layer of caramel or peanut butter between the cake layers for an extra burst of indulgence. You can also incorporate different flavored frosting or fillings to customize the cake to your taste preferences.
Embrace Seasonal Themes
Kit Kat Cakes are incredibly versatile and can be easily adapted to fit different occasions and seasonal themes. For example, during Halloween, you can decorate the cake with festive candies and add a touch of orange food coloring to the frosting for a spooky twist. During the holiday season, adorn it with edible snowflakes or red and green sprinkles. Let your creativity run wild and have fun with themed decorations.
Personalize with Message or Design
If you’re celebrating a special milestone or wanting to surprise someone with a personalized touch, consider adding a written message or design to your Kit Kat Cake. You can pipe a heartfelt message using colored frosting or use edible markers to draw a personalized design on the Kit Kat bars. This extra effort will make the cake even more memorable and meaningful.
Now that you have all the tips and tricks to create your very own Kit Kat Cake, it’s time to grab your apron, gather your ingredients, and get ready to embark on a chocolate-filled adventure. Remember to enjoy the process, indulge in every bite, and share the joy of this delicious creation with your loved ones. Happy baking!
Key Takeaways
– Indulge in layers of chocolate cake, creamy frosting, and crunchy Kit Kat bars.
– Enjoy the perfect blend of sweetness and texture in this delightful cake.
– Impress your friends and family with a homemade dessert that looks as good as it tastes.
– Make your next celebration extra special with this Kit Kat Cake recipe.
Frequently Asked Questions
If you’re a chocolate lover who wants to indulge in pure bliss, then the Kit Kat Cake recipe is perfect for you. With its combination of rich chocolate cake, creamy frosting, and crunchy Kit Kat bars, it’s a delicious treat that’ll satisfy any sweet tooth. Here are some FAQs about making this heavenly dessert:
1. Can I use a different type of chocolate for the cake?
Absolutely! While the recipe typically calls for dark chocolate, you can experiment with different types like milk chocolate or even white chocolate. Just keep in mind that it may alter the taste slightly, so choose a chocolate that complements your preferences.
If you’re feeling adventurous, you can also try using flavored chocolates like mint or caramel for added richness. The choice of chocolate is entirely up to you, so get creative and personalize the cake to your liking!
2. Can I substitute the Kit Kat bars with another type of candy?
Definitely! While Kit Kat bars are the classic choice for this recipe, you can switch them out for other delicious candies. Reese’s Peanut Butter Cups, Twix, or even Snickers would make fantastic alternatives.
The key is to choose a candy that has a similar texture and flavor profile to Kit Kats. This way, you’ll still get the satisfying crunch and chocolatey goodness in every bite. Don’t be afraid to experiment and create your own unique twist on the Kit Kat Cake!
3. How do I ensure that the frosting is smooth and creamy?
To achieve a smooth and creamy frosting, it’s important to start with softened butter. Make sure you let the butter sit at room temperature for at least 30 minutes before using it in the frosting. This will ensure that it blends smoothly with the other ingredients.
Another tip is to gradually add the powdered sugar while beating the frosting. This prevents clumps and allows the sugar to incorporate evenly, resulting in a velvety texture. If you want an extra level of creaminess, you can also add a splash of heavy cream or milk to the frosting.
4. Can I make the Kit Kat Cake ahead of time?
Yes, you can definitely make the Kit Kat Cake ahead of time. Once the cake is fully assembled and frosted, store it in the refrigerator to keep it fresh. It’s best to cover the cake with plastic wrap or place it in an airtight container to prevent it from drying out.
However, if you choose to refrigerate the cake overnight, it’s recommended to add the Kit Kat bars just before serving. This ensures that the bars remain crisp and crunchy. So, prepare the cake in advance, but don’t add the final touch of Kit Kat bars until you’re ready to wow your guests!
5. How can I personalize the Kit Kat Cake for special occasions?
The Kit Kat Cake offers endless possibilities for personalization. You can decorate it according to the theme or color scheme of a special occasion. For birthdays, consider topping it with candles or edible decorations in the celebrant’s favorite colors.
If it’s a holiday gathering, adorn the cake with seasonal decorations like sprinkles, chocolate shavings, or festive ornaments. You can also use different flavors of frosting to add variety and cater to different tastes. Get creative and let your imagination run wild to make the Kit Kat Cake a centerpiece that reflects the spirit of the occasion!
Kit Kat Chocolate Cake (Homemade Recipe)
Summary
This article shared a yummy recipe for a Kit Kat cake that you can make at home. The cake is made with chocolate and Kit Kat bars, and it’s super easy to make. All you need is a cake mix, some frosting, and Kit Kat bars. Just follow the simple steps and you’ll have a delicious cake in no time! So next time you’re craving something sweet, give this Kit Kat cake recipe a try. It’s sure to be a chocolatey delight!
Overall, this article was a fun and easy guide on how to make a tasty Kit Kat cake. It’s a perfect treat for any occasion and a great way to satisfy your chocolate cravings. So grab your ingredients and get baking! You won’t be disappointed with this delicious cake. Enjoy!